
Good quantity planning starts with a clean measurement record. Measure the space first, keep the original dimensions, and calculate the net area before you add product coverage or an allowance.

The short method
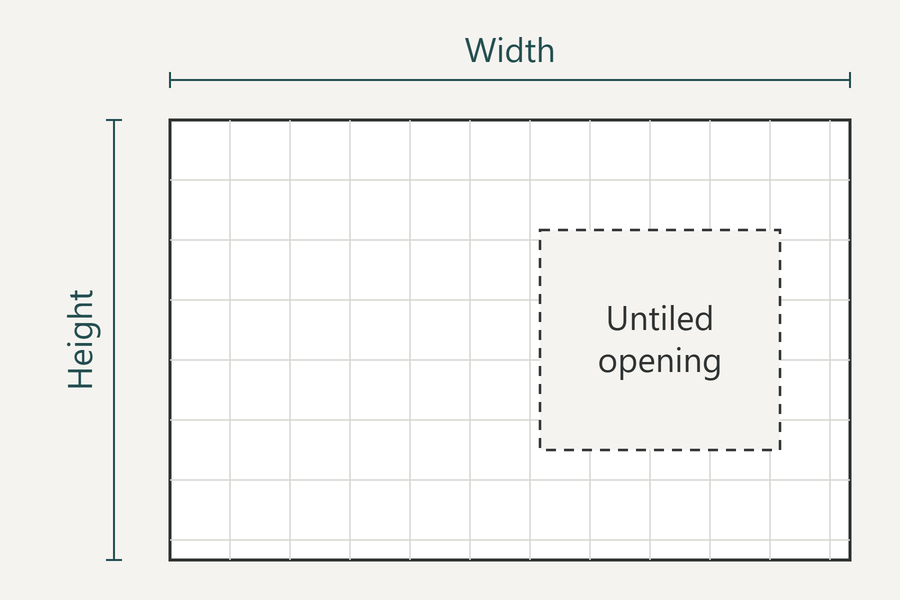
Measure each surface separately in metres. Multiply the width by the height of each rectangular area, add those areas together, then subtract openings that will not be tiled. The result is the net area.
Keep the net area separate from product coverage and allowance. Those are later inputs in the quantity calculation.
What to record before you calculate
Give every wall, floor section or splashback run its own line in your notes. For each surface, record:
- a short label, such as “sink wall” or “left return”;
- width in metres;
- height or depth in metres;
- any opening that will not be tiled; and
- a note for curves, niches, steps, changes in level or unusual edges.
A simple sketch helps. Add each dimension to the sketch and photograph the area so another person can understand what was measured. Keep the raw dimensions even after you calculate the area; they are useful if the layout changes or someone needs to check the quantity.
Measure simple rectangular areas
For a rectangle, multiply width by height:
area = width × height
Use metres for both dimensions so the result is in square metres. For example, a splashback section that is 2.2 m wide and 0.6 m high has an area of:
2.2 m × 0.6 m = 1.32 m²
Measure adjoining surfaces separately rather than treating an entire room as one number. A return wall, niche or second splashback run can then be checked and updated without rebuilding the whole calculation.
Split irregular spaces into smaller rectangles
If the area is not one simple rectangle, divide it into smaller rectangular sections. Calculate each section separately and add the results together.
This method is useful for L-shaped walls, interrupted splashbacks and floor areas with offsets. Mark the divisions on your sketch so the same area is not counted twice. Curves, columns and detailed niches may need a project-specific layout check because a rectangular area calculation does not show how sheets, tiles or cuts will fit around them.
Subtract openings carefully
Measure doors, windows or other areas that will not receive tile. Calculate each opening in the same unit, add the excluded areas together, then subtract that total from the surface area.
Only subtract an opening when you are confident it will not be tiled. Small interruptions, edges and detailing can still affect the layout and cutting even when their area is small.
Worked measurement example
Imagine two rectangular splashback sections and one opening that will not be tiled:
- first section:
2.2 m × 0.6 m = 1.32 m² - second section:
1.9 m × 0.6 m = 1.14 m² - total surface area:
1.32 m² + 1.14 m² = 2.46 m² - excluded opening:
0.6 m × 0.4 m = 0.24 m² - net area:
2.46 m² − 0.24 m² = 2.22 m²
The net measured area is 2.22 m². This example explains the measurement method only; it is not a product recommendation or an order quantity.
Keep the three quantity inputs separate
Three numbers often appear in tile planning, but they do different jobs:
- Net area is the measured area that will receive tile.
- Product coverage is the area covered by the specific item.
- Allowance is an additional quantity considered for layout, cuts, breakage or future repair.
Do not treat a generic coverage figure or allowance as a fact about a product. Use the exact product information and the requirements of the actual layout when they are available.
Tiles here are sold by the box
A net area is not yet an order quantity. Every tile in this range is priced by the box for project quantities, so the figure you are working towards is a whole number of boxes. Reaching it needs one more number: the area a single box covers.
That number belongs in the Box coverage / quantity row, inside the collapsed Specifications panel on each product page. As at August 2026 that row reads Not specified for every tile in the range, which means the supplier’s current documentation for these tiles does not state it. If the row is filled in for the tile you have chosen, that figure is the divisor. While it reads Not specified, there is no divisor to read there — and an assumed one gives a box count that looks exact, is wrong by however far the assumption was out, and shows no sign of it until the delivery arrives.
Some product pages also state a Sheet size in millimetres — the dimensions of one sheet. That is a real measurement of the product, but it is not box coverage. A box holds more than one sheet, and nothing on the product page states how many, so dividing a net area by one sheet area gives a sheet count, not a box count. Record the sheet size if it helps you check how the pattern will land at edges and returns. Sheet sizes are not standard between designs, so take the figure from the product you have chosen.
How to compare tile scale sets out which dimensions each product page states, and which of them a square metre can be built from.
What the product page’s quantity tool assumes
The product page will still hand you a box count. Its quantity selector converts between square metres and boxes, and the calculator behind How many tiles will I need? returns a box count and offers to load it into the cart. Both run on a coverage of 1.44 m² per box, and the note under the tool says so: Planner default: 1.44 m² per box. Confirm the actual pack coverage before ordering.
That 1.44 is the same figure on every tile in the range, so it is not the coverage of the one you are looking at. The same default sits behind the per-square-metre price shown beside the box price. A box count that comes out of it is an estimate standing in for a figure the range does not state — sound enough for a budget, not a number to order against.
Box coverage is not the only row that reads Not specified. What to confirm before choosing works through the rest of them before an order goes in.
Two details matter if you use it. The selector opens in square metres; Boxes is a second mode you switch to, so a figure typed in without switching is read as an area. And the tool adds its own allowance — a fixed Add 10% for cuts and wastage checkbox beside the quantity, and a 10%, 15% or 20% choice inside the calculator. If you have already added an allowance to your own figure, leave the checkbox clear and choose no allowance, rather than counting the margin twice.
Turn the net area into a box count
Once the coverage of one box is known for the exact tile, the calculation is three steps in a fixed order:
- Add the allowance to the net area. Decide the extra you want for cuts, breakage and future repair — usually set as a percentage of the net area — and add it, in square metres, to that area. Record it on its own line so it can be revised without measuring again.
-
Divide by the coverage of one box.
boxes before rounding = (net area + allowance) ÷ coverage per box - Round up to a whole box. Part of a box cannot be ordered, so the result goes up to the next whole number.
The order matters. Adding the allowance before dividing keeps it inside one calculation, which rounds up once. Round first and the allowance then has to be converted into boxes and rounded up in its own right, so the calculation rounds up twice and the two surpluses stack — enough to put you a box or more above what the job needs.
Until the coverage of your chosen tile is stated, stop at the net area and the allowance. They are the durable half of the calculation: they describe your space rather than a product, and they stay valid whichever tile you choose. Confirm the actual box coverage with your tiler before the order goes in, which is what the calculator on the product page also tells you to do.
Keep your measurement notes with the result. If the chosen product, layout or surface changes, review the inputs before relying on the quantity.
When measurement alone is not enough
If what arrives does not match what was ordered, the arithmetic is no longer the question. Your rights when tiles arrive wrong covers that case.
Area measurement does not confirm that a tile is suitable for a surface or that an installation system is appropriate. Ask for project-specific advice before ordering when the work includes:
- wet areas;
- floors or other performance-sensitive surfaces;
- curves, niches, columns or multiple returns;
- diagonal or complex patterns;
- uncertain substrates or preparation; or
- a layout where joints and edge cuts materially affect the result.
Common measurement questions
How many tiles do I need?
Work in three steps and keep them separate. First measure the net area. Second, decide an allowance for cuts, breakage and future repair, add it to that area, and record it on its own line rather than folding it into the measurement. Third, divide the total by the area one box covers and round up to a whole box. That third step needs the coverage of the exact tile, and the Box coverage / quantity row reads Not specified across this range. The quantity tool on the product page fills that gap with a fixed 1.44 m² per box for every tile — a planning default, not your tile’s coverage — so treat any box count it returns as an estimate and confirm the actual coverage before ordering.
Keeping the three numbers separate means that when one of them changes — a different product, a revised layout — you only have to redo that part.
How do I measure an irregular wall?
Split the wall into smaller rectangles, calculate each rectangle as width multiplied by height, then add the areas together. Keep a sketch showing how the sections relate to one another so the calculation can be checked.
Should I subtract windows and doors?
Subtract an opening only when that area will not be tiled. Record the opening separately so the calculation can be reviewed if the design changes.
Should I round the measured area?
Keep the area calculation at a useful precision. Round a sheet or box quantity only after the exact product coverage and any chosen allowance have been applied.
Does measuring the area confirm that a tile is suitable?
No. Area measurement only prepares a quantity input. Product suitability, substrate preparation and installation requirements need separate project- and product-specific checks.
How many spare tiles should I keep, and from which batch?
Keep them from the same delivery. Every product page here says shade and surface vary between production batches, and a top-up bought later can be a different batch; one forum poster who extended a tiled area found the new tiles a shade darker than the old and the join read as a checkerboard. Agree the spare count with the tiler as part of the cutting allowance, in tiles or sheets, since box contents are not recorded on these pages, and store the spares flat and dry with the sample piece. A repair years later is made from that pile, not from a new order.
Where this guide sits: Where to start sets out the order the guides follow.
